Difference between revisions of "ModelSim ENG"
(Simu explanation) |
|||
| Line 97: | Line 97: | ||
To invoke the simulator: | To invoke the simulator: | ||
| − | + | # Simulate | |
| − | + | # Start Simulation | |
| − | + | # In the design tab find work library. | |
| − | + | ## In the work library find the topmost design’s testbench you wish to simulate. | |
| − | + | ## Be aware to uncheck the Enable optimization box. | |
| + | # Optimization Options | ||
| + | # "Apply full visibility to all modules (full debug mode)" | ||
| + | ## Selecting this will keep all debug signals in your design | ||
| + | # Ok. | ||
| − | + | [[File:ModelSim_simlation.png|800px|ModelSim Simulation]]<br> | |
| + | Figure 4. Starting simulation for the design TestBench | ||
| + | |||
| + | The “'''loading…'''” message will appear in the main window to <br> | ||
| + | confirm that the files have loaded correctly. <br> | ||
| + | If you receive an error message asking to re-compile the testbench design, <br> | ||
| + | then you have compiled the files in the wrong order. | ||
| + | |||
| + | ====Organizing the display==== | ||
| + | Usually, windows Workspace, Objects, and Wave are used during simulation (Figure 5).<br> | ||
| + | These should open automatically, OR you can open them from the '''View''' menu. | ||
| + | |||
| + | ====Adding Signals to Wave window==== | ||
| + | |||
| + | # Highlight the '''Objects''' window by clicking it. | ||
| + | # Right-click on the '''Objects''' window | ||
| + | # '''Add to''' -> '''Wave''' -> '''Signals in Design''' | ||
| + | |||
| + | [[File:ModelSim_signal_wave.png|800px|ModelSim Simulation]]<br> | ||
| + | Figure 5. Adding design signals to the '''Wave''' window | ||
| + | |||
| + | ===Running Simulation=== | ||
| + | |||
| + | ====Using run command==== | ||
| + | You can run the simulation for a set amount of time by typing run X in the command<br> | ||
| + | line of the Main window, where X is the number of nanoseconds that you wish to run for.<br> | ||
| + | For example, run for 100 ns: VSIM > '''run 100 ns''' | ||
| + | |||
| + | Command run without specifying the time will execute the simulation for the<br> | ||
| + | default amount of time. You can set the default run period: | ||
| + | |||
| + | * Simulate->Runtime Options… | ||
| + | * Enter the amount of time into the Default Run box. | ||
| + | * Select Ok. | ||
| + | * Simulate->Run->Run “default time” ns. | ||
| + | |||
| + | ====Using GUI==== | ||
| + | Find icons shown in Figure 6 in the '''Main''' window.<br> | ||
| + | You will need to use Icons (explained in bold) most commonly. | ||
| + | |||
| + | [[File:ModelSim_simulation_run_gui.png|300px|ModelSim Simulation Buttons]]<br> | ||
| + | Figure 6. ModelSim Simulation Buttons | ||
| + | |||
| + | # '''Restart''': Restarts the simulation | ||
| + | # '''100ns''' (default): custom time for simulation length | ||
| + | # '''Run''': Simulates for custom specified time | ||
| + | # Continue Run | ||
| + | # '''Run All''': Runs simulation endlessly OR until "wait" statement is reached in the testbench | ||
| + | # Break: Pauses the simulation | ||
| + | # Stop: Stops Simulation without the possibility of continuing. | ||
Latest revision as of 11:31, 20 February 2025
Contents
Before we start
Go to your project directory in the linux command line by using command cd
Example:
cd ~/P/lab_1
If your target directory does not exist, you can create it with command mkdir
Example:
mkdir -p /P/lab_1
IT IS HIGHLY SUGGESTED to develop your code in the ~/Desktop directory.
After you completed your work move (mv) or copy (cp) your work to the ~/P folder.
Linux environment setup
In the lab class, we need to set up the Linux command line environment, which allows us to use ModelSim.
The command for the environment choices is cad. The command must be entered twice.
To select ModelSim, choose option 2 (Mentor Graphics 2021 EDA version).
Another important note to remember is that ModelSim doesn’t support CTRL+c shortcut.
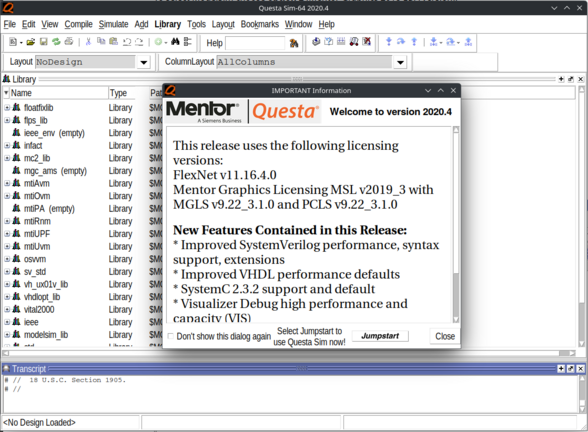
Starting ModelSim
To start the program, you must insert the command
vsim &
The & in the end of the command shows that the program is run in the background and the
prompt is returned immediately. It means that to run another process, you don’t have
to open a new command line window. You can use & behind every process command.
If you forgot to change your working directory before, it is also possible to do it now.
File->Change Directory
Navigate to the directory containing your design files
Ok
Compiling the design
To compile your design you can either create a new project and compile the files
in the project or just compile every file without creating a project. Somewhat
easier is to create a new project. This gives you the chance to open the project
later without any need to specify the files in there or the library used.
Option1: Compilation without project creation - preferred
Creating a compilation library
A compilation library is a directory on your disk into which all HDL designs are compiled.
You can specify this library through the ModelSim or it can be created using operation system
commands. Usual library name is work. Now lets create a directory called work
and map the directory to the logical library named work.
- File->New->Library
- Select Create a new library and a logical mapping to it (Figure 2).
- Type work into the library form. Note that it’s duplicated.
- Select Ok.
- Verify that the directory with the name work has been created in your lab directory.
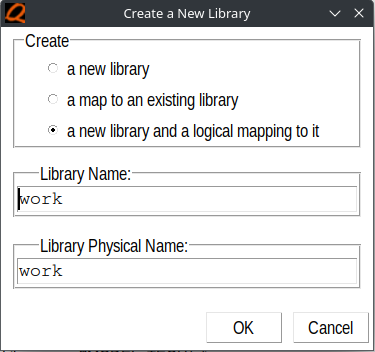
Figure 2. Creating new work library
Compiling your design
Now lets compile the design.
For example we’ll take the lab1 mux.vhd VHDL file.
- Compile->Compile…
- The following dialog box appears (Figure 3).
- Make sure that Library is set to work.
- Select the design file you want to compile, for example mux.vhd and then click Compile.
- Check the main ModelSim window for the results of compilation.
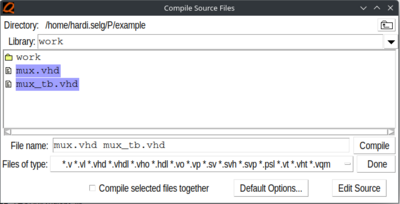
Figure 3. Compiling source files
Option2: Compiling with project creation - WIP
Simulation
Starting the simulator
To invoke the simulator:
- Simulate
- Start Simulation
- In the design tab find work library.
- In the work library find the topmost design’s testbench you wish to simulate.
- Be aware to uncheck the Enable optimization box.
- Optimization Options
- "Apply full visibility to all modules (full debug mode)"
- Selecting this will keep all debug signals in your design
- Ok.
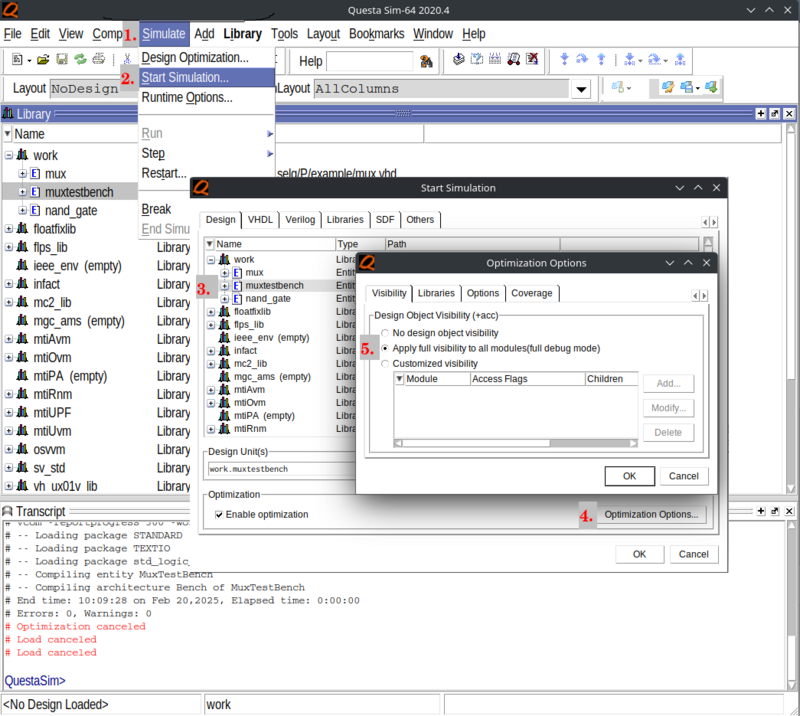
Figure 4. Starting simulation for the design TestBench
The “loading…” message will appear in the main window to
confirm that the files have loaded correctly.
If you receive an error message asking to re-compile the testbench design,
then you have compiled the files in the wrong order.
Organizing the display
Usually, windows Workspace, Objects, and Wave are used during simulation (Figure 5).
These should open automatically, OR you can open them from the View menu.
Adding Signals to Wave window
- Highlight the Objects window by clicking it.
- Right-click on the Objects window
- Add to -> Wave -> Signals in Design
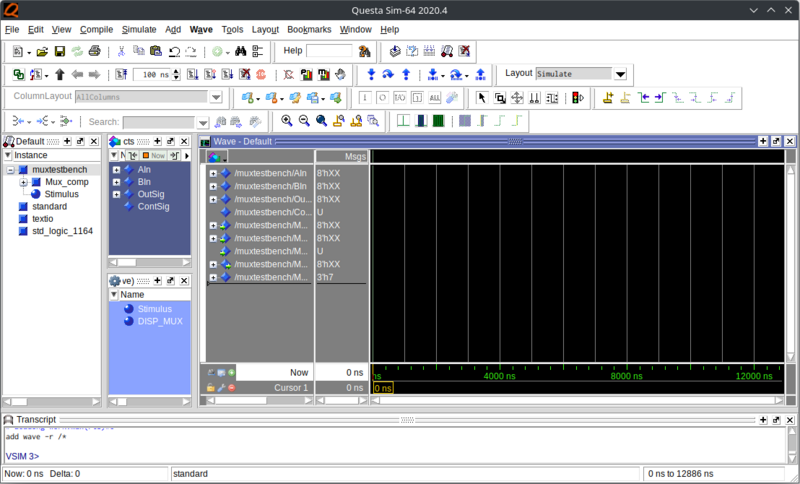
Figure 5. Adding design signals to the Wave window
Running Simulation
Using run command
You can run the simulation for a set amount of time by typing run X in the command
line of the Main window, where X is the number of nanoseconds that you wish to run for.
For example, run for 100 ns: VSIM > run 100 ns
Command run without specifying the time will execute the simulation for the
default amount of time. You can set the default run period:
- Simulate->Runtime Options…
- Enter the amount of time into the Default Run box.
- Select Ok.
- Simulate->Run->Run “default time” ns.
Using GUI
Find icons shown in Figure 6 in the Main window.
You will need to use Icons (explained in bold) most commonly.

Figure 6. ModelSim Simulation Buttons
- Restart: Restarts the simulation
- 100ns (default): custom time for simulation length
- Run: Simulates for custom specified time
- Continue Run
- Run All: Runs simulation endlessly OR until "wait" statement is reached in the testbench
- Break: Pauses the simulation
- Stop: Stops Simulation without the possibility of continuing.
